| 일 | 월 | 화 | 수 | 목 | 금 | 토 |
|---|---|---|---|---|---|---|
| 1 | 2 | 3 | ||||
| 4 | 5 | 6 | 7 | 8 | 9 | 10 |
| 11 | 12 | 13 | 14 | 15 | 16 | 17 |
| 18 | 19 | 20 | 21 | 22 | 23 | 24 |
| 25 | 26 | 27 | 28 | 29 | 30 | 31 |
- PIR
- stl
- 큐
- softmax
- Programmers
- DFS
- join
- Queue
- 모두를 위한 딥러닝
- sort
- c++
- 모두를 위한 머신러닝
- deep learning
- 알고리즘 고득점 kit
- BOJ
- deque
- CSAP
- SQL
- 정렬
- Machine learning
- 시간초과
- TensorFlow
- ML
- Neural Network
- 한화오션
- sung kim
- Linear Regression
- mysql
- 백준
- 프로그래머스
- Today
- Total
hello, world!
[ML lab 11-1] Tensorflow CNN Basics 본문
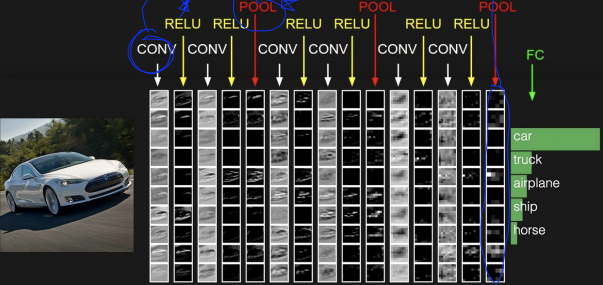
Convolutional Neural Networks
이미지나 텍스트 분류에서 좋은 성능을 발휘한다.
고양이의 뇌가 입력을 한번에 안받고 나누어 받는 것에서 착안했다.
image에서 filter의 크기만큼 input x를 받아서 filter W로 하나의 값을 낸다. (Wx + b)
ex.) filter 크기인 5*5만큼 읽은 input x가 x1, x2, x3, x4라면, filter w1, w2, w3, w4로
w1x1 + w2x2 + w3x3 + w4x4 + b 연산을 하여 one number를 출력한다.
같은 w값의 filter는 몇 칸씩 이동하며 이미지 전체를 읽는다.
stride = 한번에 이동하는 칸 수
output size = (N - F) / (stride) + 1
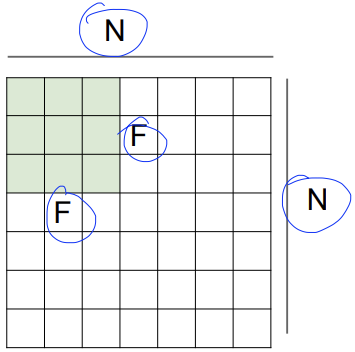
stride가 커질수록 output size가 작아진다.
output size가 작아질수록 정보를 잃는다!
그래서 padding이라는 개념을 사용한다.
Padding
테두리를 0으로 둘러싼 가상적인 입력이 있다고 가정하여 모서리를 알려주는 것이다.
padding을 하면 input size와 output size가 같아진다.
n개의 filter -> 두께가 n인 convolution layer
Pooling layer (sampling)

Max Pooling
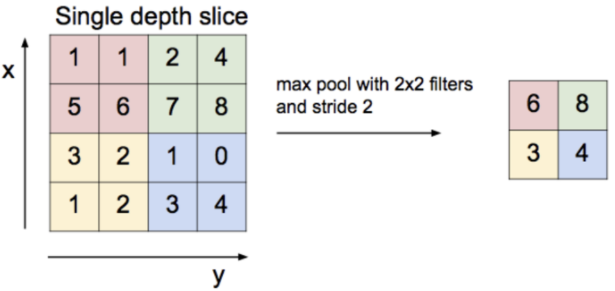
가장 큰 값을 선택하여 sampling하는 것이다.
[Toy image]
import tensorflow.compat.v1 as tf
from matplotlib import pyplot as plt
tf.disable_v2_behavior()

sess = tf.InteractiveSession()
image = np.array([[[[1], [2], [3]],
                   [[4], [5], [6]],
                   [[7], [8], [9]]]], dtype = np.float32)
print(image.shape)

# imshow() 통해 이미지를 시각화
plt.imshow(image.reshape(3, 3), cmap = 'Greys')
[출력]

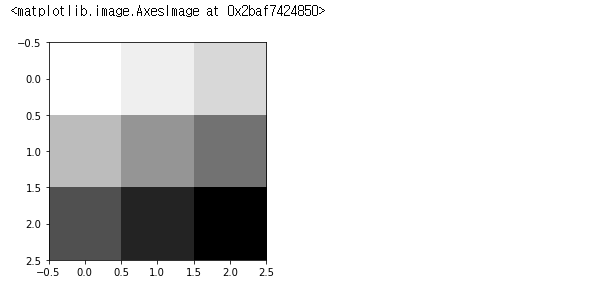
shape을 살펴보자면,
1개의 이미지를 만들었는데, 3 * 3 크기의 1개의 color를 갖도록 만들었다.
[Simple convolution layer]
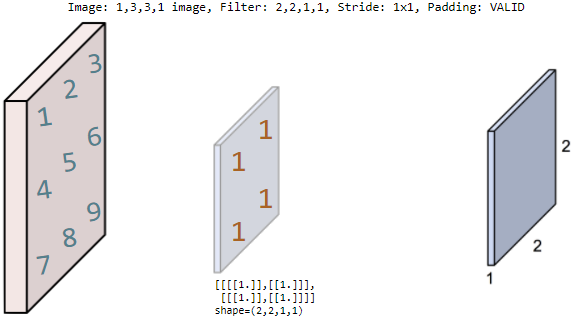
filter의 shape (2, 2, 1, 1)은
filter의 크기가 2 * 2이며, 1개의 color를 갖고, filter의 개수가 1장임을 뜻한다.
# print("imag:\n", image)
print("image.shape", image.shape)

weight = tf.constant([[[[1.]], [[1.]]],
                      [[[1.]], [[1.]]]])
print("weight.shape", weight.shape)

# conv2d()는 image와 weight(=filter)만 넣어주면 알아서 계산해준다.
conv2d = tf.nn.conv2d(image, weight, strides = [1, 1, 1, 1], padding = 'VALID')

# 실행
conv2d_img = conv2d.eval()

# 출력
print("conv2d_img.shape", conv2d_img.shape)
conv2d_img = np.swapaxes(conv2d_img, 0, 3)
for i, one_img in enumerate(conv2d_img):
    print(one_img.reshape(2, 2))
    plt.subplot(1, 2, i+1), plt.imshow(one_img.reshape(2, 2), cmap = 'gray')
[출력]
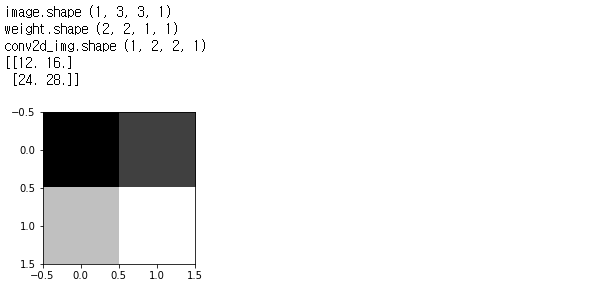
conv2d()를 통해 w1x1 + w2x2 + w3x3 + w4x4 연산을 한다.
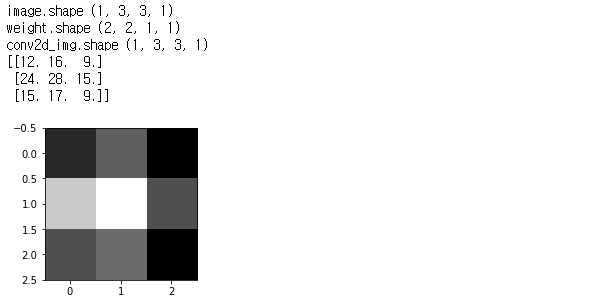
[Simple convolution layer: padding]
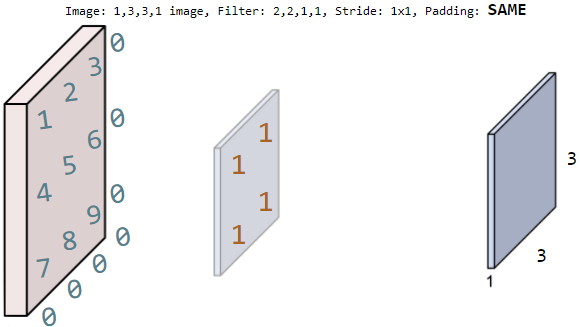
padding = 'SAME'으로 설정하면 zero padding이 되면서
input 이미지와 크기가 같은 output size가 나온다.
print("image.shape", image.shape)

weight = tf.constant([[[[1.]], [[1.]]],
                      [[[1.]], [[1.]]]])
print("weight.shape", weight.shape)

conv2d = tf.nn.conv2d(image, weight, strides = [1, 1, 1, 1], padding = 'SAME')
conv2d_img = conv2d.eval()

print("conv2d_img.shape", conv2d_img.shape)

conv2d_img = np.swapaxes(conv2d_img, 0, 3)
for i, one_img in enumerate(conv2d_img):
    print(one_img.reshape(3, 3))
    plt.subplot(1, 2, i+1), plt.imshow(one_img.reshape(3, 3), cmap = 'gray')
[출력]
[3 filters]
print("image.shape", image.shape)

weight = tf.constant([[[[1.,10.,-1.]],[[1.,10.,-1.]]],
                      [[[1.,10.,-1.]],[[1.,10.,-1.]]]])
print("weight.shape", weight.shape)

conv2d = tf.nn.conv2d(image, weight, strides=[1, 1, 1, 1], padding='SAME')
conv2d_img = conv2d.eval()

print("conv2d_img.shape", conv2d_img.shape)
conv2d_img = np.swapaxes(conv2d_img, 0, 3)
for i, one_img in enumerate(conv2d_img):
    print(one_img.reshape(3,3))
    plt.subplot(1,3,i+1), plt.imshow(one_img.reshape(3,3), cmap='gray')
weight(filter)의 shape (2, 2, 1, 3)은
filter의 크기가 2 * 2이며, 1개의 color를 갖고, filter의 개수가 3장임을 뜻한다.
[출력]
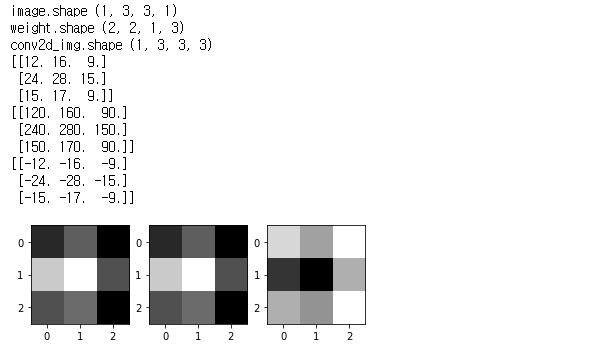
filter를 3장 쓰면 이미지도 3장이 나온다.
[Max Pooling]
image = np.array([[[[4],[3]],
                    [[2],[1]]]], dtype=np.float32)
pool = tf.nn.max_pool(image, ksize=[1, 2, 2, 1],
                    strides=[1, 1, 1, 1], padding='SAME')
print(pool.shape)
print(pool.eval())
[출력]

'AI > 모두를 위한 ML (SungKim)' 카테고리의 다른 글
| [ML lab 11-2] MNIST 99% with CNN (0) | 2021.02.24 |
|---|---|
| [ML lab 10] NN, ReLu, Xavier, Dropout, and Adam (0) | 2021.02.24 |
| [ML lab 09-2] Tensorboard (Neural Net for XOR) (0) | 2021.02.21 |
| [ML lab 09-1] Neural Net for XOR (0) | 2021.02.21 |
| [ML lab 08] Tensor Manipulation (0) | 2021.02.20 |

